最近打不开网站了,经过查找:
关于 hexo 主题 nexT 博客加载空白问题
GitHub Pages 禁止了 source/vendors 目录的访问.
我的解决方案:
去next主题下:1
git pull
总算能访问了。
悲剧了,其他的我都要重新设置,页面已经显示很丑了。
有时间再整整吧。
最近打不开网站了,经过查找:
关于 hexo 主题 nexT 博客加载空白问题
GitHub Pages 禁止了 source/vendors 目录的访问.
我的解决方案:
去next主题下:1
git pull
总算能访问了。
悲剧了,其他的我都要重新设置,页面已经显示很丑了。
有时间再整整吧。
安装了sourcetree, 竟然过期了。过了很久都不知道怎么弄。
恰巧新的电脑上,也要安装。
误打误撞,解决了这个问题。
在安装的时候,选择已有账号: adogandamouse(我以前已经注册过的)
然后它会发个邮件。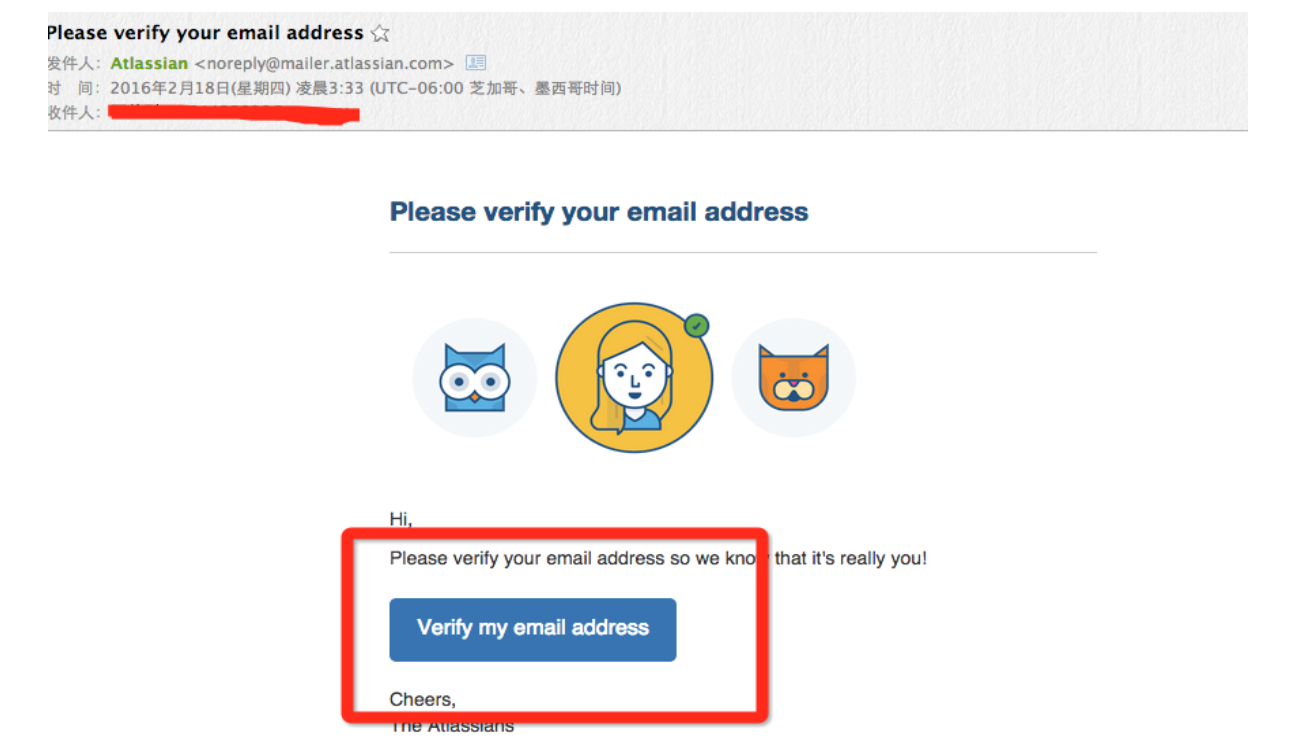
verify 一下。
打开页面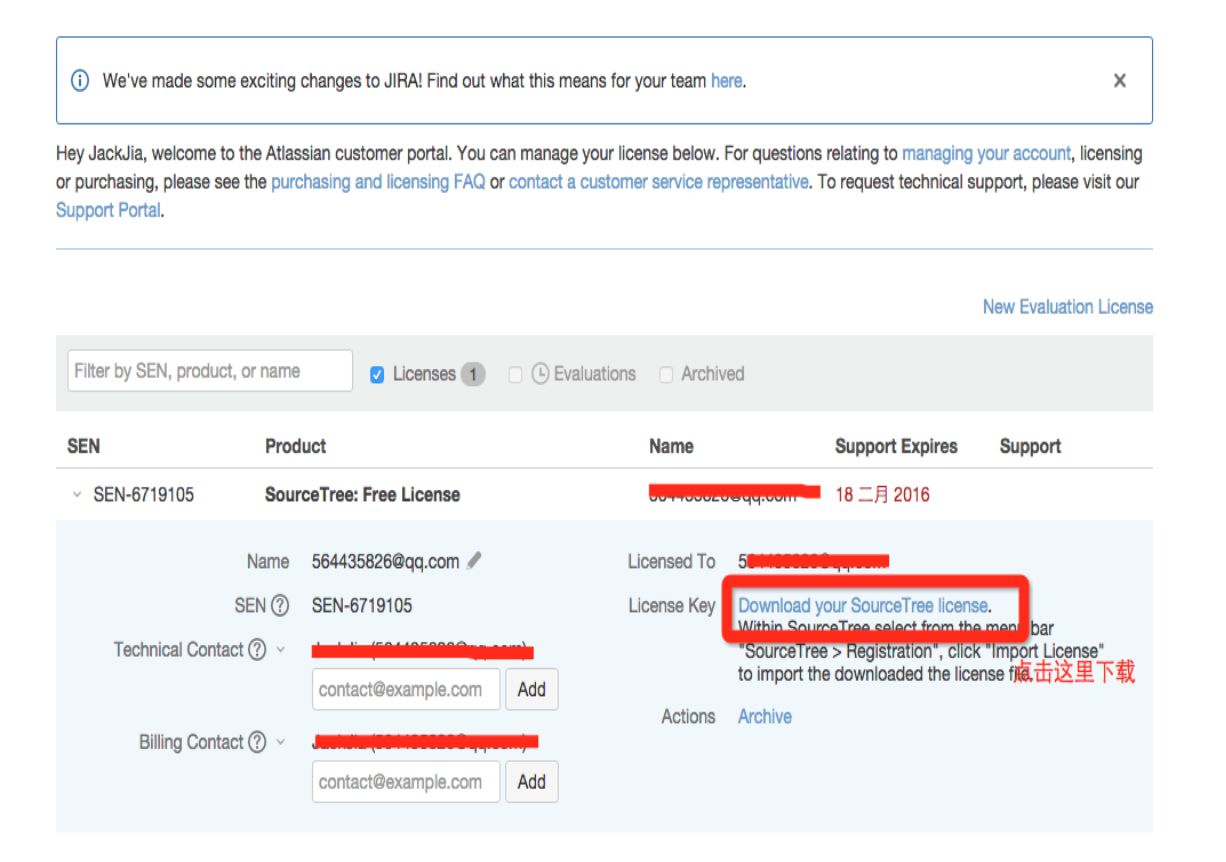
就可以看到免费的license 了,下载下来。
新安装的直接就可以继续。
mac上直接拖进去。
The Apache JMeter™ application is open source software, a 100% pure Java application designed to load test functional behavior and measure performance.
What does it do?
Apache JMeter features include:
Ability to load and performance test many different server/protocol types:
Web - HTTP, HTTPS
SOAP / REST
FTP
Database via JDBC
LDAP
Message-oriented middleware (MOM) via JMS
Mail - SMTP(S), POP3(S) and IMAP(S)
Native commands or shell scripts
TCP
Complete portability and 100% Java purity.
How to build a test plan?
Add “Test Plan” –>”Threads”–>”Thread Group”.
Add “Thread”–>”Sampler”–>”HTTP Request”.
Then configure the request.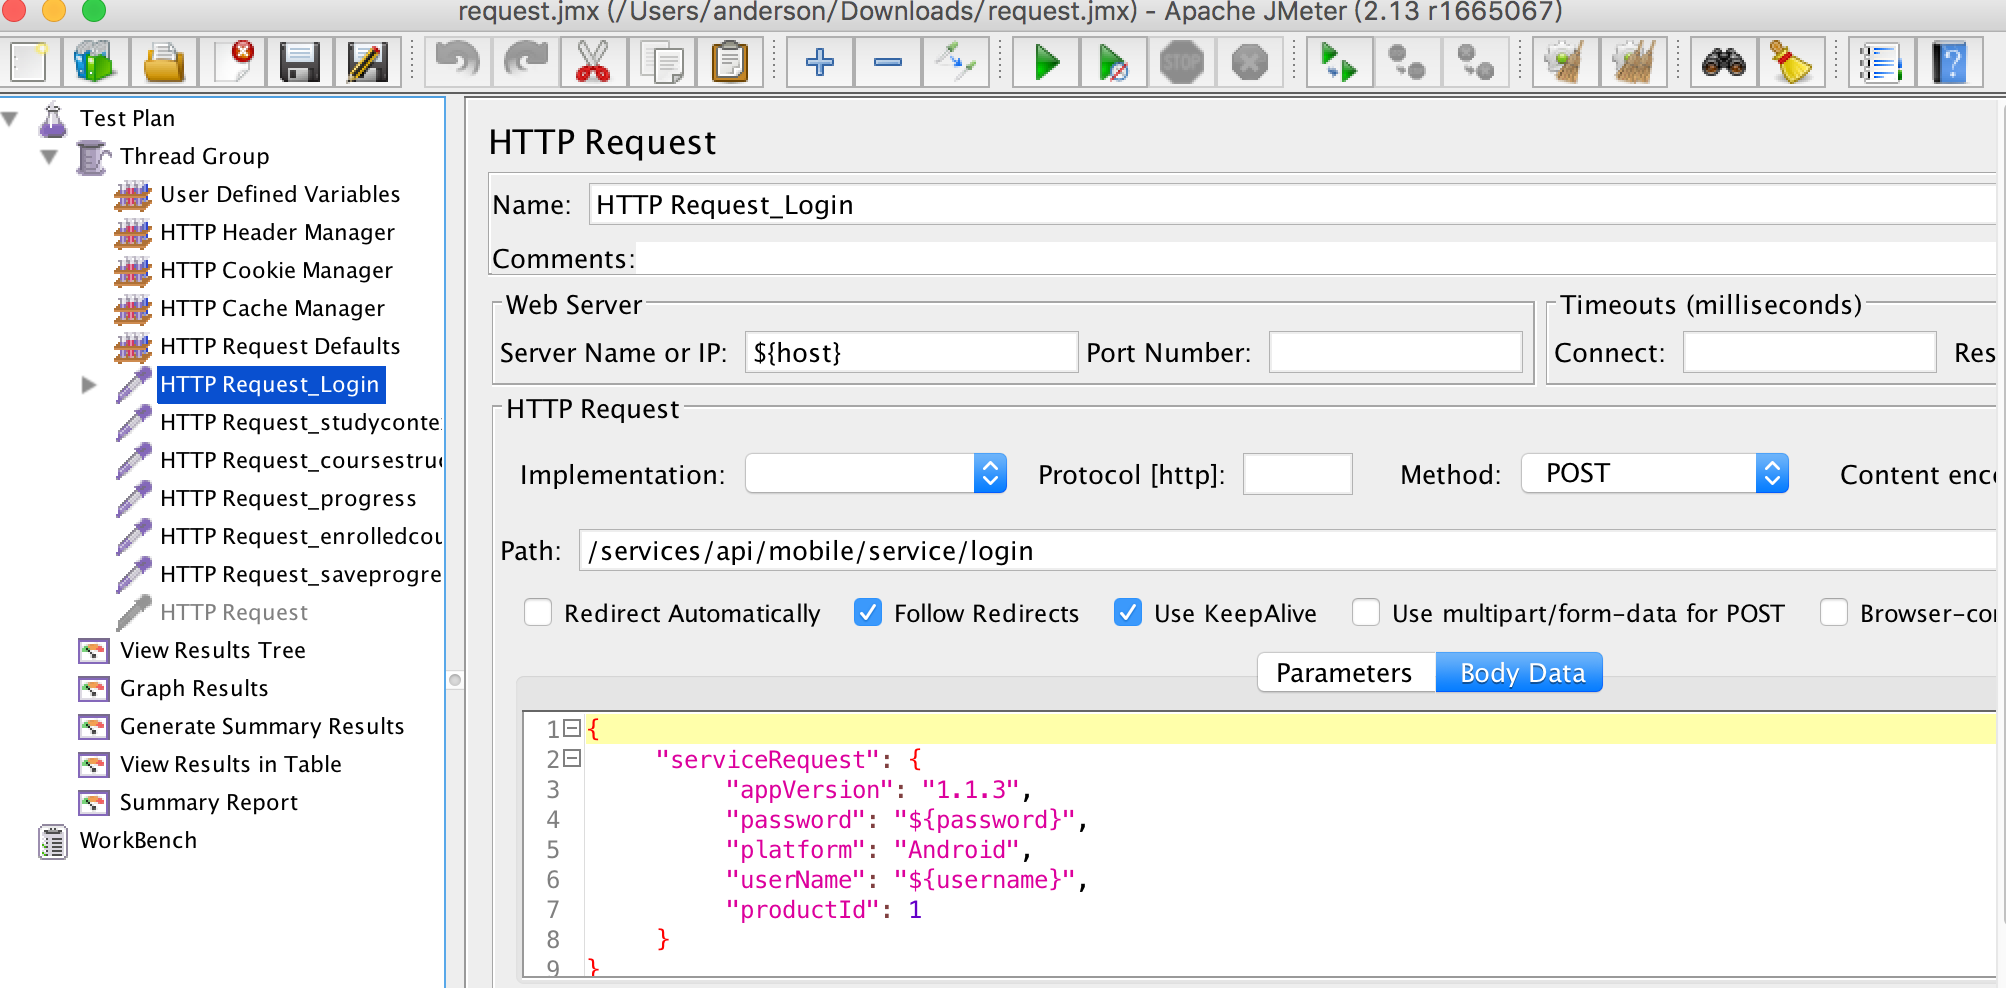
Add “User Defined Variables” and define global variables.
Add “HTTP Header Manager” to define Json type:
Content-Type : application/json; charset=utf-8
How to get Token and sessionId:
Add “Post Processors”–>”Regular Expression Extractor”
configure like this: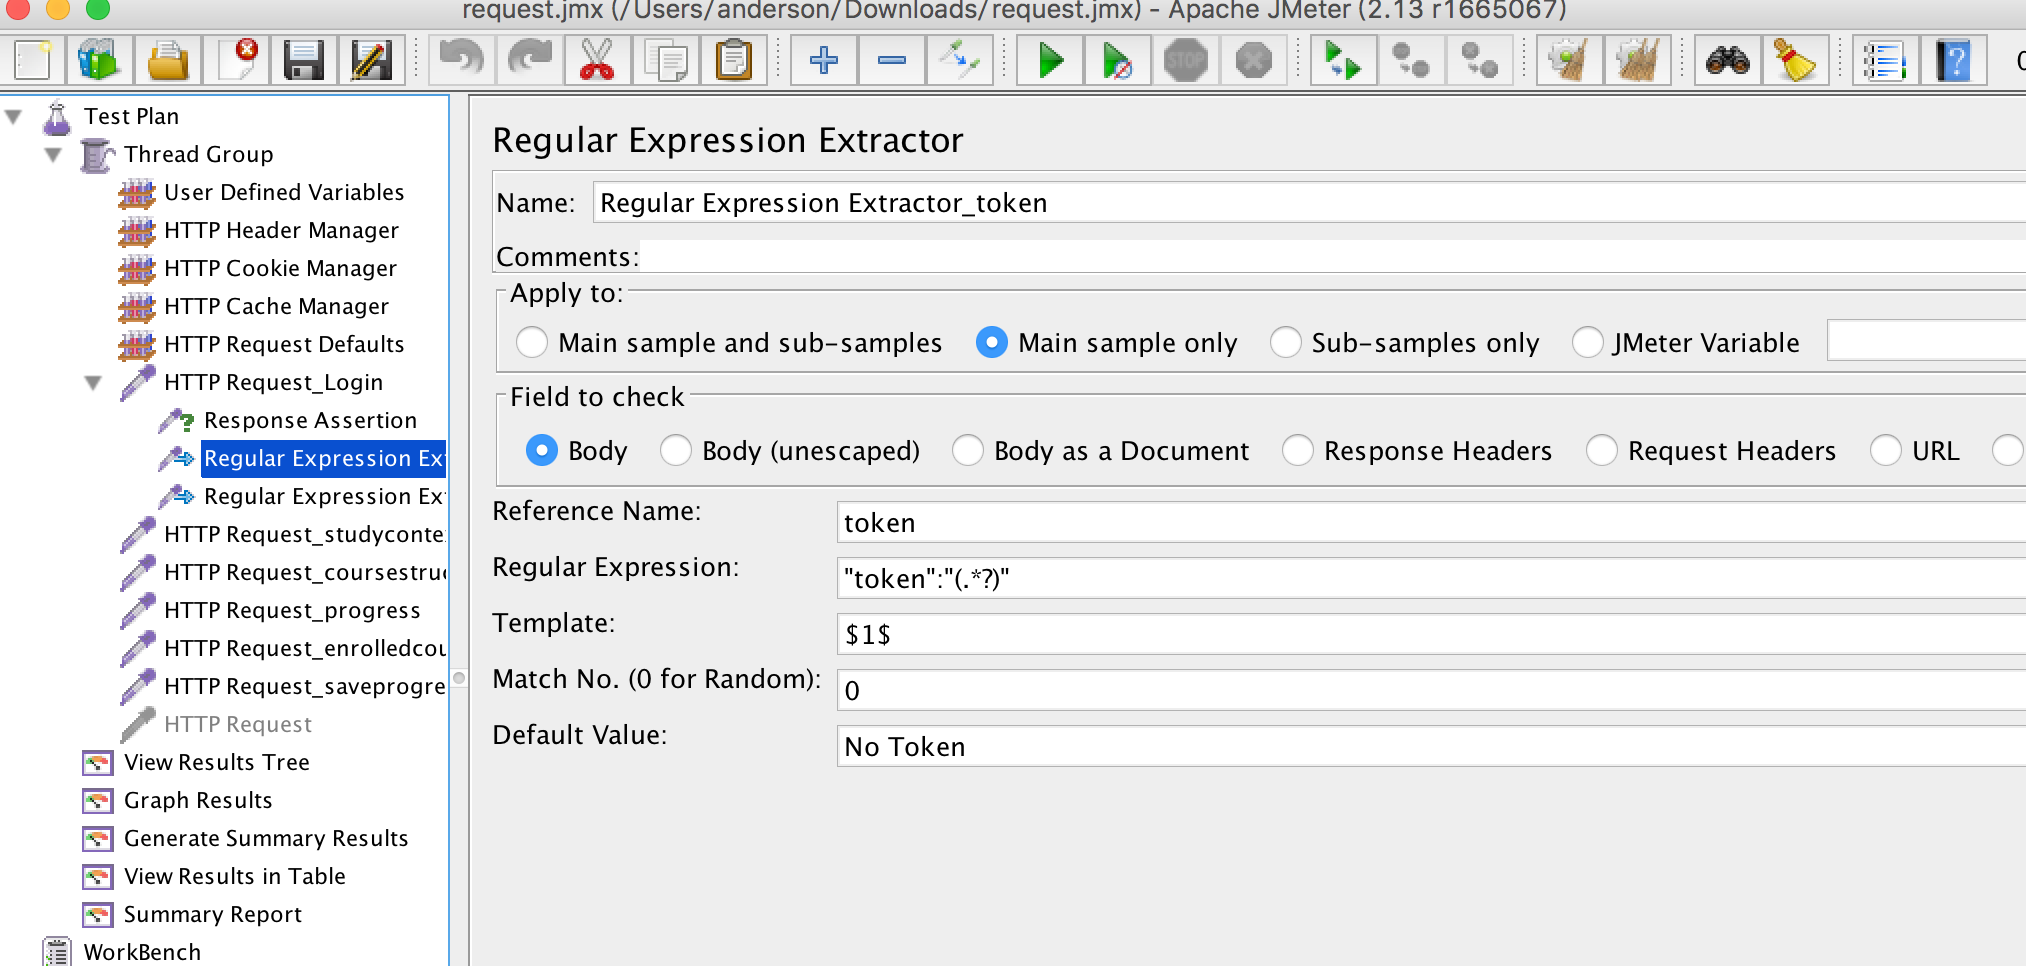
How to add stress
configure like this:
stress = threads * loop count
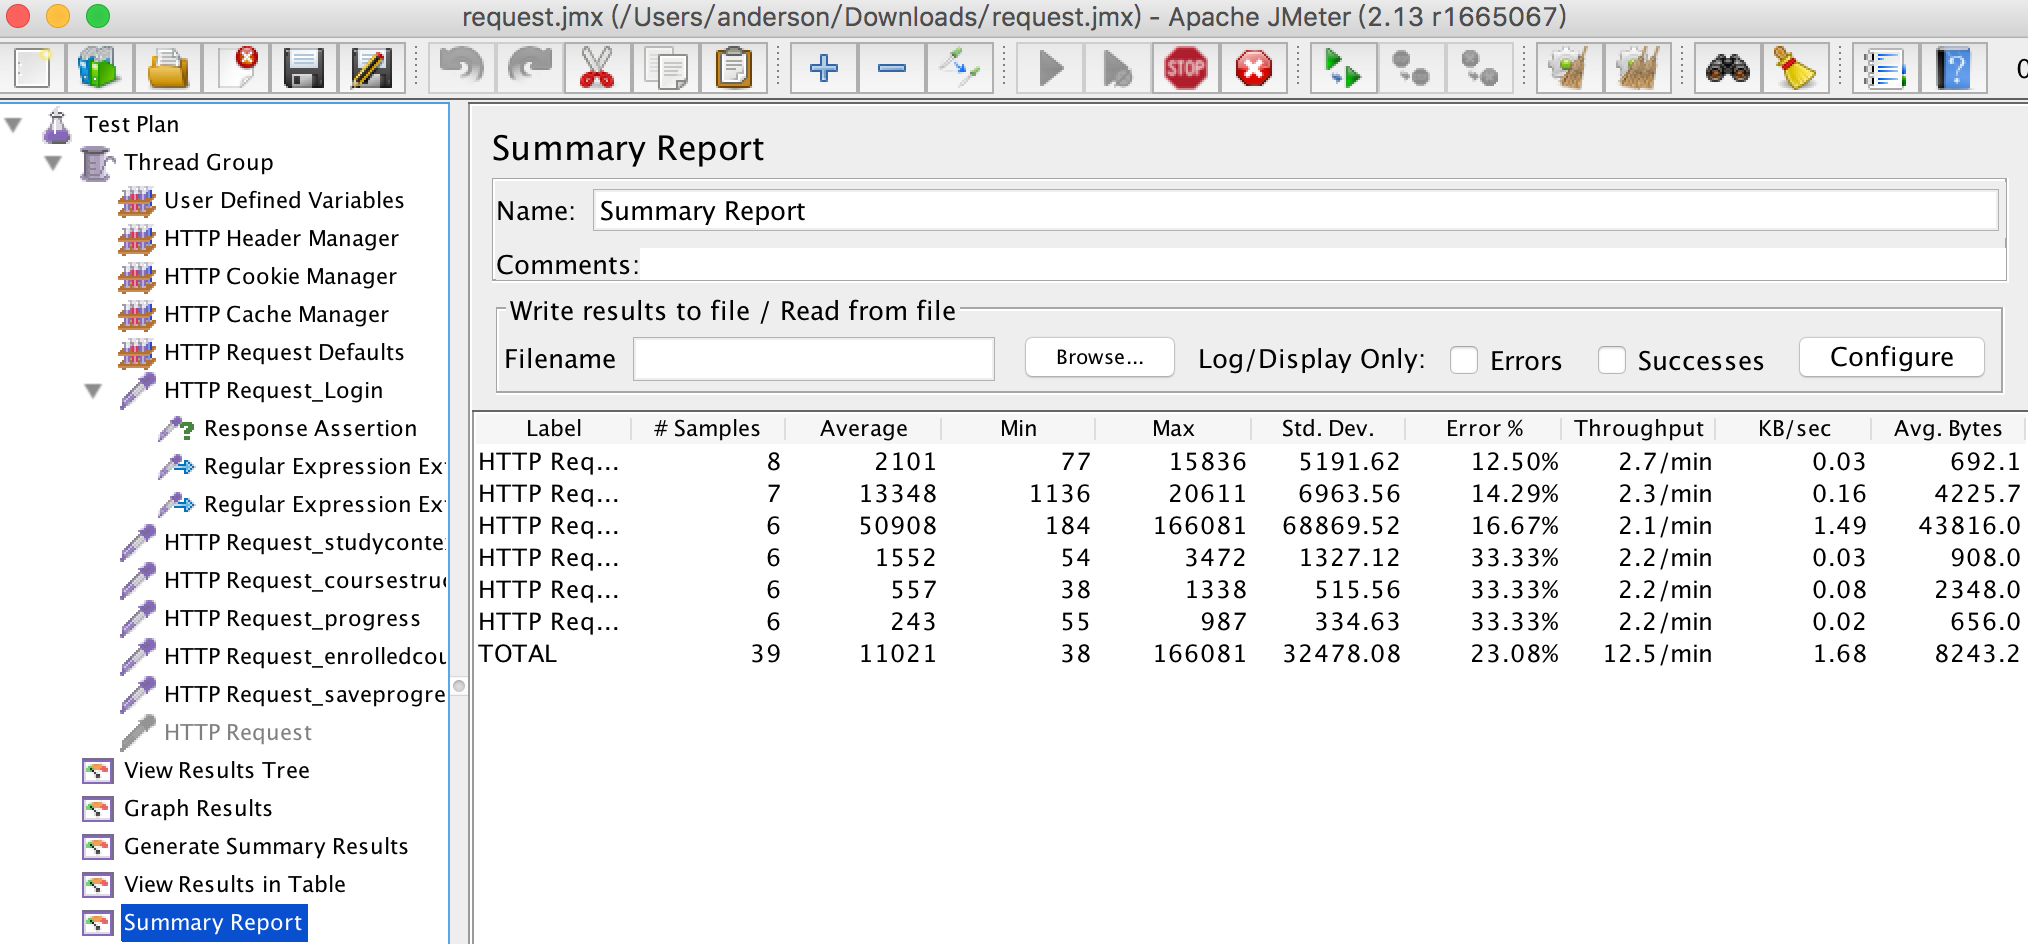
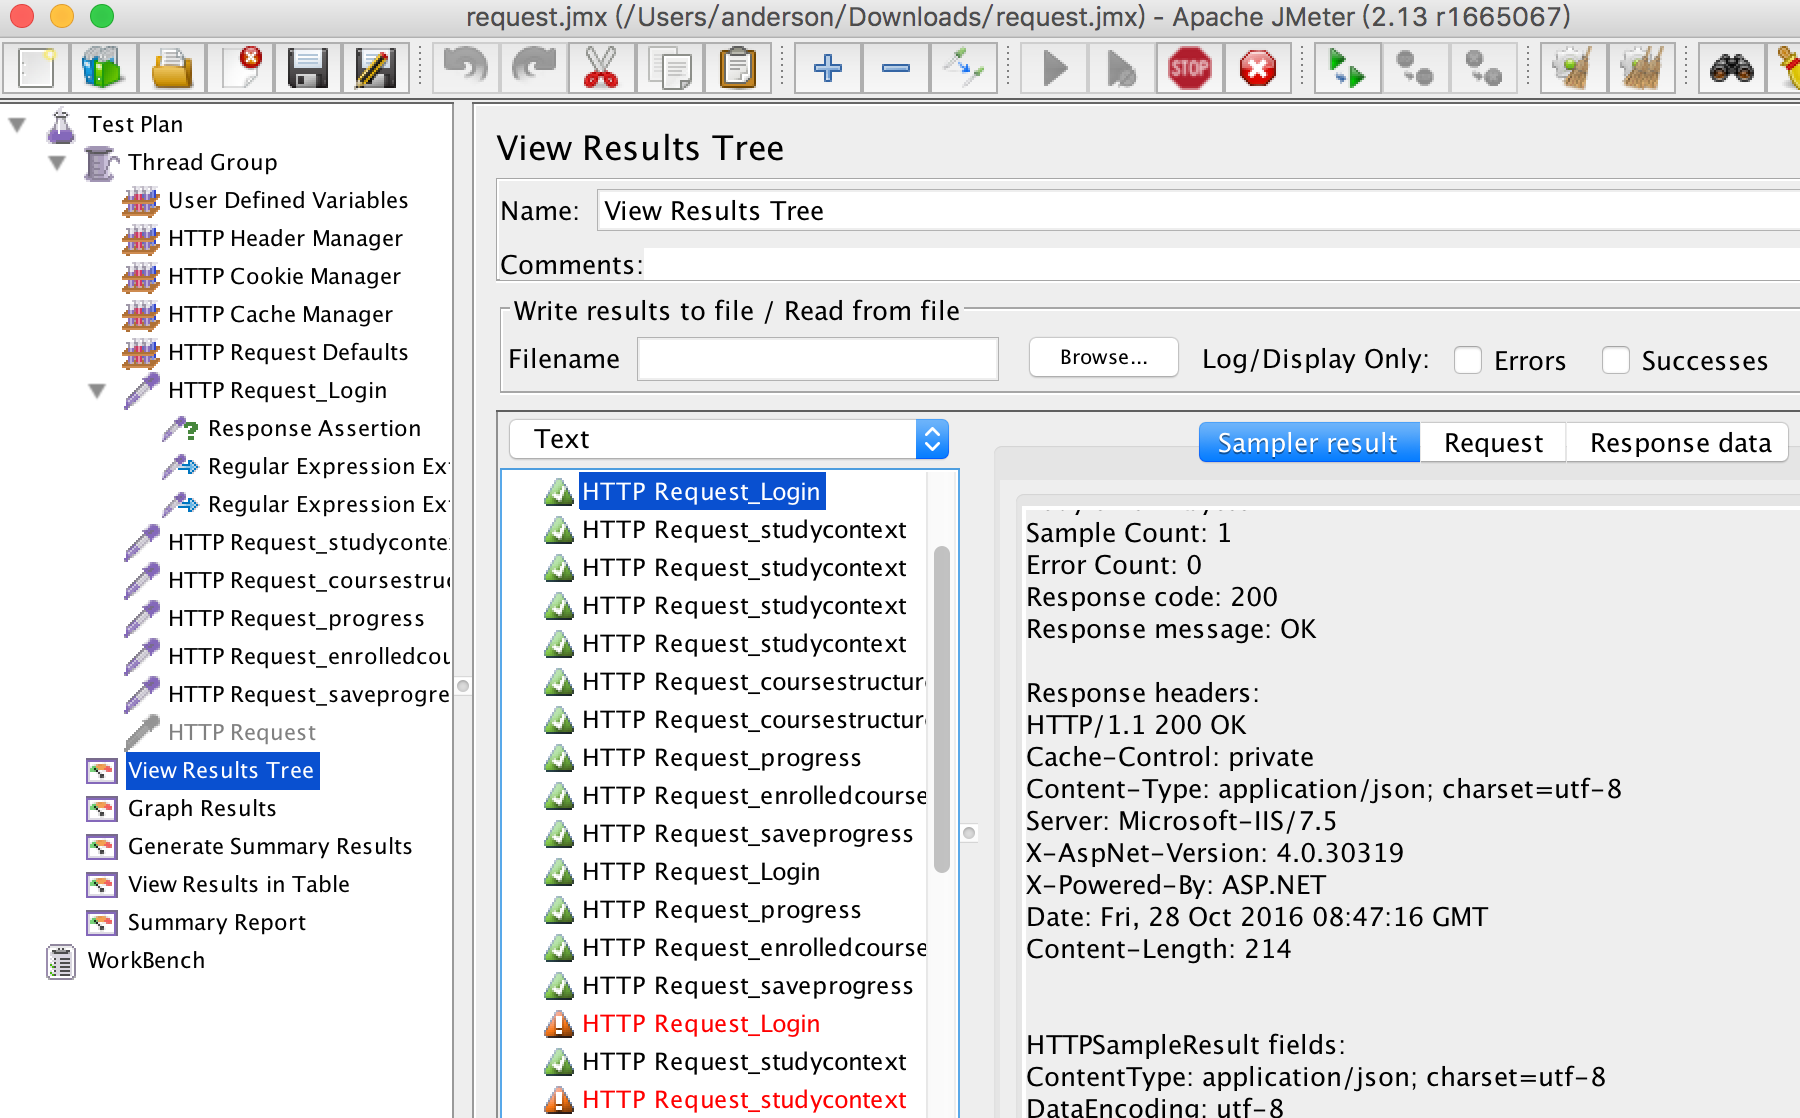
Check Result: Under listener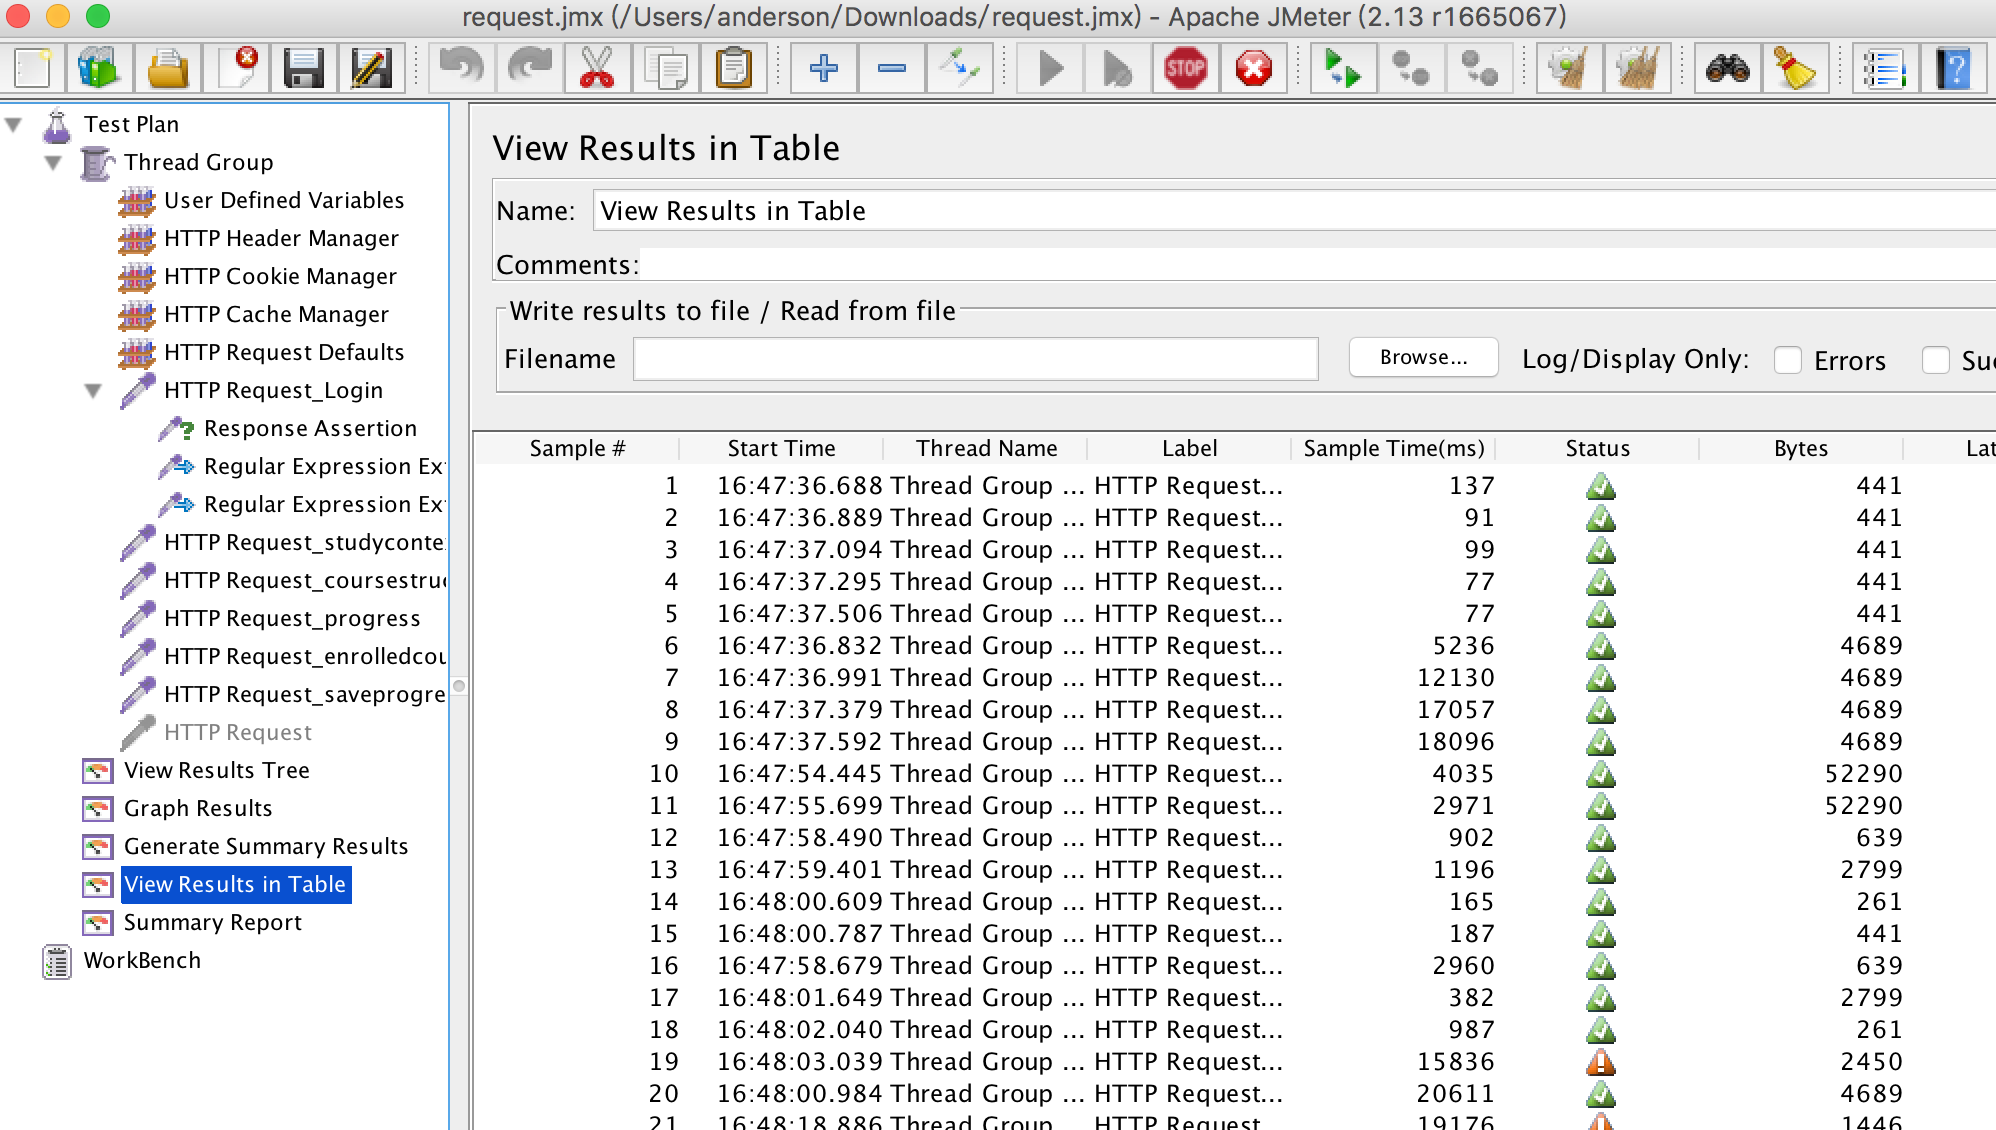
Run as command:
jmeter -n -t test.jmx -l test.jtl
So can run in Jenkins.
Run Jmeter on Jenkins
首先得温习一些命令:
执行系统命令
主流的有4种os.system()、os.popen()、commands.getstatusoutput()、subprocess.Popen()
1 | os.system() 这种是最简单的,但是只能执行,不能获取返回值 |
log记录
1 | # util.py |
使用python random模块的choice方法随机选择某个元素
1 | foo = ['a', 'b', 'c', 'd', 'e'] from random import choice print choice(foo) |
使用python random模块的sample函数从列表中随机选择一组元素
1 | list = [1, 2, 3, 4, 5, 6, 7, 8, 9, 10] slice = random.sample(list, 5) #从list中随机获取5个元素,作为一个片断返回 print slice print list #原有序列并没有改变。 |
每次安装PIL出错, 最近找到一篇文章
Mac安装PIL模块
1 | sudo easy_install -f http://www.pythonware.com/products/pil/ Imaging |
最近做 iOS 相关的事情比较多,发现其实 iOS 下还是有很多和 android 可以对应的操作,所以在此记录一下。
备注: iOS 用到的ideviceinstaller,idevicesyslog 等命令安装命令为:brew install libimobiledevice
应用相关
1、 安装应用(真机)
1 | Android |
2、 卸载应用(真机)
1 | Android |
3、 获取应用唯一标识
其实也不算唯一标识了,只是大部分操作会用到。
Android: packageName
获取方式很多,只举其中一个比较容易的:
1 | $ apktool d xxx.apk -o xxx |
4、从源码构建应用安装包
这里只举 debug 包
android(现在 android studio 项目已经很流行了,所以就不说 ant 了)
1 | $ cd /source-folder/ |
注意:没翻墙情况下貌似不能自动下载 gradle ,那么可以自行下载 gradle 后用 gradle 的 bin 文件代替此处的 gradlew 。
1 | $ ./gradlew build |
build 完的 apk 包放在 Application/build/outputs/apk 中
iOS 真机
1 | $ cd /source-folder/ |
注意,末尾的 exportProvisioningProfile 参数值是在 Xcode 的 Performance->Accounts->Apple ID->View Details 窗口的下半部分看到的名称。如 iOS Team Provisioning Profile: chj.ToDoList
1 | $ xcodebuild -exportArchive -archivePath |
设备相关
1、查看设备中的应用列表
1 | Android |
2、获取真机实时日志
1 | Android |
3、获取当前连接的设备列表
1 | Android |
Android
1 | import os |
IOS
1 | import os |
为啥写这篇文章?因为前面一个事故,送AppStore的版本发错了。一打听,这样的事故发生过好几次。
苹果有太多限制,在测试中拿到包不是易事。
目前流行的有如下几种:
1.使用iTunes将iPa同步到手机中;
2.使用itms-services协议进行下载分发;
3.使用第三方工具进行下载分发,如:蒲公英,fir…
现在就以2来说说如何自己来实现分发。
流程如下:
我们得解决证书的问题。可以参考iOS 证书申请和使用详解
如果搞不定,可以找开发帮忙。
把生成的证书放到server上。
用flask 搭建web service, 比较简单。
将证书放到upload中,添上如下代码,可以上传下载证书了。
1 | @app.route('/upload', methods=['POST']) |
原理是通过Safari解析链接中的”itms-services://“来实现的。
链接指向plist,plist指向IPA。
例如:
1 | <a title="iPhone" href="itms-services://?action=download-manifest&url=https://192.168.**.***/install.plist">Download</a> |
Safari会去读取install.plist中的信息,如:iOS应用的名称、版本、安装地址等.(这些信息,打包的时候就知道,如果不知道,可以把ipa解压,从解压的info.plist里面去获取,填到自己创建的install.plist里面)
1 | <?xml version="1.0" encoding="UTF-8"?> |
我们把刚刚建好的plist文件(这里取名为install.plist)、ipa包、ca证书放到Web服务器的文件目录下,然后修改index.html中的内容。
(index.html内容):
1 | <!DOCTYPE html PUBLIC "-//W3C//DTD XHTML 1.0 Transitional//EN" "http://www.w3.org/TR/xhtml1/DTD/xhtml1-transitional.dtd"> |
我们用iphone打开浏览器,输入本地服务器的地址,然后再点击Download,哈哈,是不是已经弹出对话框询问需要安装了??
Oops, 弹出的框是”Cannot connect to *“
怎么办? 服务器没有配置https.
我们用openssl来生成
1 | openssl req -x509 -sha256 -nodes -days 365 -newkey rsa:2048 -keyout ***.key -out ***.crt |
代码中添加:
1 | from flask import Flask |
解决了SSL问题,重新启动服务,就可以下载了。
然后扩展一下web service 功能(如二维码),做美观一下。
参考:
比较喜欢flask这个框架,轻便好用。
在搭建web时,有时候需要用到https.作者在搭建IOS分发的时候,itms-services 就需要https.
本文就以自己搭建的做个说明。
Before starting a server with SSL, you need to create private key and a certificate.
1) .key –> private key
2) .ct –>Self signed certificate
eg: 在主路径下建一个文件夹来存认证文件1
openssl req -x509 -sha256 -nodes -days 365 -newkey rsa:2048 -keyout anderson.key -out anderson.crt
代码应该是这样子的:
1 | from flask import Flask |
运行起来:
1 | * Running on https://0.0.0.0:5000/ (Press CTRL+C to quit) |
页面打开,就有https了。
结构
1 | ├── __init__.py |
安装
1 | flask |
manage.py
1 | # encoding=utf-8 |
app.py
1 | #encoding=utf-8 |
models.py
1 | #encoding=utf-8 |
layout.html
index.html
1 | {% extends "layout.html" %} |
show.html
1 | {% extends "layout.html" %} |
数据库操作:
1 | $ mysql.server start $ mysql -h localhost -u root -p |
mysql查看表结构命令,如下:
desc 表名;
show columns from 表名;
describe 表名;
show create table 表名;
then run:
➜ testdb python manage.py runserver
本文发表在公众号: 软件测试精品
敏捷模式下迭代频繁,回归测试时总是不知道变动的范围。Dev 有的时候也不知道他改了哪些东西,影响到哪些节点,或者是很多人改的,彼此不知道。遇到有代码洁癖的,改了别人的代码,大家都不知道。通常情况是,要么测试范围定小了,遗漏了;要么测试范围过大,付出过多代价。每次回归,Tester 心里总没底,生怕漏了哪里。如何才能准确定位到变更范围呢?
作者尝试通过对source code 的变动,来达到了解应用的功能模块变化范围。从而制定回归范围和smoke范围。现在大多数公司用git, 本文就以git 为例。在git 中,用这条命令,就可以查看source change log.
1 | git whatchanged |
例如:
1 | git whatchanged --since='2 weeks ago' |
就可以得到最近2周所有commit 的信息。
首先对comments 进行统计。进行词频分析。
1 | def get_words_dict(target): |
去除无效的词,自己定义一个list:
1 | remove_words = ['the', 'a', 'bug', 'to', 'of', 'so', 'one', 'more', 'we', 'Update', 'app', 'our', 'issue','want', 'work'] |
为了防止图片展示不清楚,同时还写一份log.
这样,就可以大概知道改动了。如果懂些代码,可以深入到代码里面去看。或者拉着Dev一起看,确定最终范围。当然如果Dev的comments 写得够清楚,文件命名很规范,那就更好了。还可以辅助sourcecode 界面工具辅助查看。
这样,每次回归就不会那么没有底了。
完整代码:
1 | #!/usr/bin/python |
Matplotlib是一个Python工具箱,用于科学计算的数据可视化。借助它,Python可以绘制如Matlab和Octave多种多样的数据图形。
圆饼图-pie()
pie()最基本的输入数据是一个数组。它可以根据数组元素的比例绘制扇形,因此不必要事先计算好百分比。
1 | import matplotlib.pyplot as plt |
样式
有几个最常用的参数可以控制绘图样式:
colors - 数组,扇形颜色
explode - 数组,扇形偏离圆心的距离
labels - 数组,扇形的标签
首先,让我们为饼图设定颜色,并让第三个扇形抽离出来:
1 | import matplotlib.pyplot as plt |
然后,要为每个扇形添加标签:
1 | import matplotlib.pyplot as plt |
百分比
如何显示百分比数值呢?我们需要使用autopct参数:
None,不显示百分比
格式字符串,如‘%d percent‘,显示“40 percent”形式的百分比
方法,调用方法输出百分比
1 | import matplotlib.pyplot as plt |
autopct=‘%d%%‘表示我们将百分比以整数(%d)形式输出,后缀是百分号‘%‘。在格式化字符串中,百分号要用‘%%‘转义字符表示。
1 | from pylab import * |
柱形图-bar()
什么是最简单的bar,看如下语句你就知道她有多么简单了:
1 | import matplotlib.pyplot as plt |
left:柱形的左边缘的位置,如果我们指定1那么当前柱形的左边缘的x值就是1.0了
height:这是柱形的高度,也就是Y轴的值了
left,height除了可以使用单独的值(此时是一个柱形),也可以使用元组来替换(此时代表多个矩形)。例如,下面的例子:
1 | import matplotlib.pyplot as plt |
当然,可能你还觉得这两个矩形“太胖”了。此时我们可以通过指定bar的width参数来设置它们的宽度。
此时又来需求了,我需要标明x,y轴的说明。比如x轴是性别,y轴是人数。实现也很简单,看代码:
1 | import matplotlib.pyplot as plt |
接下来,让我们在x轴上的每个bar进行说明。比如第一个是“男”,第二个是“女”。
我们可以通过直接指定bar方法里面的align=”center”就可以让文字居中了。
接下来,我们还可以给图标加入标题。
plt.title(u”性别比例分析”)
当然,还有图例也少不掉:
1 | import matplotlib.pyplot as plt |
柱状图-bar()
bar()函数可以绘制各种样式的柱状图,barh()则可绘制水平方向的柱状图。两个方法除了绘图方向外,其他属性和用法的是相同的。
数据和坐标
bar()至少需要两个数组left和height:left是每个柱向左到坐标原点的距离;height是每个柱的高度。
1 | mport matplotlib.pyplot as plt |
样式
bar()函数的参数可以控制柱状图的多种样式,最常用的有:
width,第3个参数,柱的宽度。可以是一个常数或数组。数组将对每条柱设定不同的值。
bottom,第4个参数,柱底部的y轴坐标。可以是一个常数或数组。数组将对每条柱设定不同的值。
color,关键字参数,柱的填充颜色。可以是一个常数或数组。数组将对每条柱设定不同的值。
edgecolor,关键字参数,柱的边框颜色。
linewidth,关键字参数,边框宽度。
xerr,yerr,关键字参数,x和y轴误差线。
ecolor,关键字参数,误差线颜色。
align,关键字参数,设定柱的对齐方式。‘edge‘将x坐标设为左边界,‘center‘将x坐标设为中轴线。
下面的柱状图要表达一件商品12个月的销量:
1 | import matplotlib.pyplot as plt |
我们设置柱宽度0.5,填充颜色‘y‘(黄色),边框颜色‘g‘(绿色),线框宽度3,对齐方式为‘center‘
1 | import matplotlib.pyplot as plt |
多段柱图和水平柱图
绘制多段柱图的原理是:先后绘制多张柱图,依次重叠在上方,如果后面绘制的柱图比前者的柱图短,就可以显示出前者长出的部分。
1 | import matplotlib.pyplot as plt |
最后,让我们来绘制一个水平柱图,只需将bar()替换成barh():
1 | import matplotlib.pyplot as plt |
折线图和散点图-plot()
plot()函数可以绘制折线图和折线图,取决于您使用的参数。
数据和坐标
1 | import matplotlib.pyplot as plt |
绘制折线图/散点图需要一系列关键点。x是关键点的x轴坐标,y是关键点的y轴坐标。
x轴坐标是可以缺省的:
plot(y)
y是一个一维数组,是折线图关键点的y轴坐标。而x轴坐标没有给出,会默认以[0,1,2,…]的常数列作为x轴坐标。
样式
散点图和折线图只是线条样式的差异,我们可以通过简单的参数设置线条的样式和颜色。样式和颜色参数都是一个或多个字符构成的字符串。
既可以单独设定颜色或样式,如‘g‘代表绿色,‘-‘代表实线
也可以同时设定样式和颜色,比如‘–g‘代表绿色虚线,其中‘–‘代表虚线,‘g‘代表绿色
样式字符串中的参数字符是无顺序的,‘g–‘和‘–g‘的意义是相同的
也可以同时设定折线和散点,如‘-or‘代表红色实线+圆圈
1 | import matplotlib.pyplot as plt |
折线样式:
参数 样式
‘-‘ 实线
‘–‘ 虚线
‘-.‘ 线-点
‘:‘ 点虚线
散点样式:
参数 样式
‘.‘ 实心点
‘o‘ 圆圈
‘,‘ 一个像素点
‘x‘ 叉号
‘+‘ 十字
‘*‘ 星号
‘^‘ ‘v‘ ‘<‘ ‘>‘ 三角形(上下左右)
‘1‘ ‘2‘ ‘3‘ ‘4‘ 三叉号(上下左右)
颜色:
参数 颜色
‘b‘ 蓝
‘g‘ 绿
‘r‘ 红
‘c‘ 青
‘m‘ 品红
‘y‘ 黄
‘k‘ 黑
‘w‘ 白
您也可以不必使用样式字符串,而直接使用参数名,这种方式更加灵活:
1 | plot(x, y, color=‘green‘, linestyle=‘dashed‘, marker=‘o‘, markerfacecolor=‘blue‘, markersize=12) |
多条线
我们可以在一个坐标中绘制多条折线或散点,plot(第一条线的参数,第二条线的参数…):
1 | import matplotlib.pyplot as plt |
更多请参考